Introduction and Background
There are several implementations available for nesting GridViews on the internet. On MSDN, there is a set of code available, but that does not solve the problem of most developers. Just adding another GridView in the template field of the parent GridView is not enough.
CodeProject already has a solution available, but that involves writing methods in JavaScript: EditNestedGridView.
I am going to show you how it can be implemented without writing any JavaScript code and by letting AJAX do the work.
Procedure
I'll start off quick from the beginning so that those developers who are new with this behavior of GridView won’t have any issues achieving the end result.
Create a GridView and add a Template File to the GridView. You can achieve this by going into Edit Columns from GridViewTasks. Once this is done, Edit Template and Insert a LinkButton with " + " as its Text property. Make it X-Large and remove the Underline. Insert a child GridView right next to the LinkButton.
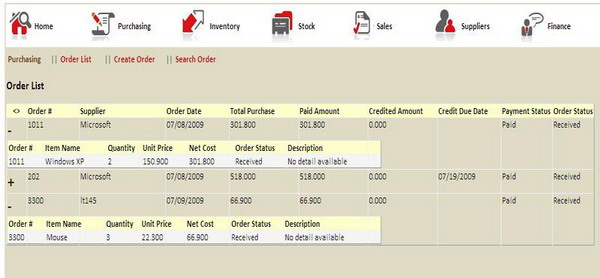
These kinds of arrangements are usually required when you already have a relationship between two tables. Like in my example, there is a relationship between the Order Table and the Detail Table. I assume you have already created the SqlDataSources for both GridViews according to your requirements.
The important thing here is that, you must not assign any Source to the Parameter in the child GridView's SqlDataSource. In other words, assign the source as "None" for the Child DataSource.
<asp:SqlDataSource ID="SqlDataSource2" runat="server" ConnectionString="<%$ ConnectionStrings:IVN_sysConnectionString %>" SelectCommand="SELECT [order_no_fk], [item_name], [order_status], [description], [quantity], [unit_price], [net_cost], [order_detail_no] FROM [order_detail] WHERE ([order_no_fk] = @order_no_fk)" > <SelectParameters> <asp:Parameter Name="order_no_fk" Type="String" /> </SelectParameters> Once you are done with it, return back to the parent GridView and create an event handler for RowDataBound.
protected void GridView1_RowDataBound(object sender,GridViewRowEventArgs e) { if (e.Row.RowType == DataControlRowType.DataRow) { SqlDataSource s = (SqlDataSource)e.Row.FindControl("SqlDataSource2"); s.SelectParameters[0].DefaultValue = e.Row.Cells[1].Text; } }This is the part of code that is actually available at MSDN, most of you may already have gone through this but, I'll just explain it in a few simple words.
Our goal over here is to assign the parameter source value, the one earlier we declared as "None" in the SqlDataSource of the child GridView. For starters who have just seen this type of code for the first time, I think it will now be a little bit more meaningful.
Now, go back to the Template Field and create an event handler for the LinkButton1_Click event. Before actually writing the event handler, you have to create an ASP Panel inside the Template Field. Place the child GridView in the newly created ASPPanel. Note that the LinkButton must remain outside the Panel you have just added.
Make the Visible property of the ASP Panel equals "False".
protected void LinkButton1_Click(object sender, EventArgs e) { LinkButton l_btn = (LinkButton)sender; GridViewRow gvr = (GridViewRow)l_btn.NamingContainer Panel p1 = (Panel)gvr.FindControl("Panel1"); LinkButton lb1 = (LinkButton)gvr.FindControl("LinkButton1"); if (p1.Visible == false) { p1.Visible = true; lb1.Text = "-"; } else if (p1.Visible == true) { p1.Visible = false; lb1.Text = "+"; } GridView gv2 = (GridView)l_btn.FindControl("GridView2"); gv2.DataBind(); }You can achieve your desired formatting just by adjusting the width of the ASP Panel. It won't make a difference if your childGridView has a greater width than the ASP Panel.
Finally, go to the parent GridView and vertical align each row at the Top position. This way, you can see the parent's row entries when the child grid pops underneath it.
Whenever “+” is pressed, you experience a postback. You can simply use the AJAX UpdatePanel to overcome this behavior. Just add the AJAX UpdatePanel and simply place your parent GridView inside the UpdatePanel. That will give you the desired nested GridView.
License
This article, along with any associated source code and files, is licensed under The Code Project Open License (CPOL)
No comments:
Post a Comment